Step-by-Step Guide: Easy Canopy Set Up for Custom-Printed Tents
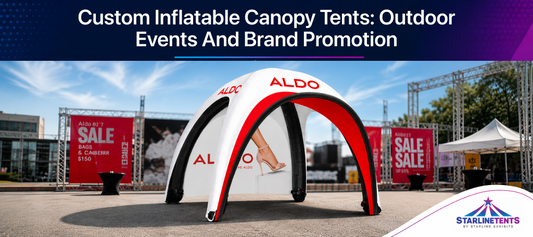
Custom-printed canopy tents are essential for businesses that operate outdoors. Whether at outdoor events, product demos, street fairs, or corporate events, a well-designed branded tent strengthens presence and promotes visibility. It defines your space, carries your brand identity, and functions as mobile signage.
This guide outlines how to set up a canopy tent designed for branding—not for recreational or party use. These canopy tent instructions are built around commercial, high-visibility applications where professionalism and brand clarity matter.
Pre-Setup Preparation
Every successful business tent set up begins with careful preparation. This ensures the structure performs as intended, maintains a polished appearance, and supports your brand goals in high-traffic settings.
Preparation Steps:
-
Inspect all components: canopy frame, printed top, hardware, stakes, and optional sidewalls.
-
Confirm you’re working on a flat, open space, with enough room to fully expand and anchor the tent.
-
Review your event layout so your logo and visuals face the crowd or key traffic areas.
Check for weather changes that could affect setup or safety (e.g., wind or rain).
Branded canopy tents typically use UV-resistant polyester with reinforced stitching to preserve graphic quality in outdoor use.
Step-by-Step Setup Instructions
Here’s hw to set up a pop up tent designed for business branding. Most units follow a collapsible frame design and can be assembled by two people in under 10 minutes.
Step 1: Unpack and inspect
Remove all items from the carry bag. Check the custom canopy top for folds, dirt, or printing defects. Inspect the frame and connection points.
Step 2: Set the frame on the ground
Place the collapsed frame on your setup area. With a person on each corner, pull outward to expand it to about 75%. This partial extension allows room to place the canopy top without stressing the frame.
Step 3: Attach the printed canopy top
Align the canopy so that logos and graphics face the front. Fasten each corner using the Velcro or loop systems built into the frame. Tension points should be even to prevent sagging or rotation during full expansion.
Step 4: Expand the frame fully
Pull outward from opposite corners until the trusses lock into place. Secure the center support bar if applicable. This step locks the structure and supports the printed top in full display position.
Step 5: Raise the legs
Adjust each leg to the desired height using the push-button or pin-lock mechanism. Ensure the structure remains level and straight across all four sides.
Step 6: Anchor the tent
Use stakes for soft surfaces or weighted bags for pavement. Tension ropes or guy lines improve wind resistance. A proper business tent set up always includes secure anchoring to protect your team, materials, and branding.
Step 7: Install branded walls or banners
Sidewalls can feature additional messaging or imagery. Attach these using zippers or Velcro, ensuring they align properly with the main design. Use banner bars or hooks to hang signs across the frame.
Branding & Visual Check
After the easy canopy set up is complete, inspect the tent from all angles. Your tent is your display—it should reflect your brand’s professionalism.
Confirm:
-
The logo is centered and visible from a distance.
-
All graphics are clean, upright, and wrinkle-free.
-
The canopy fabric is smooth and stretched evenly over the frame.
-
Sidewalls, if used, are aligned and consistent with top branding.
Clarity and alignment directly impact foot traffic. A well-displayed brand can raise event visibility and strengthen customer trust.
Safety and Stability Tips
Custom-printed tents are often used in crowded, outdoor business environments. Stability is key to maintaining your booth’s performance and keeping your brand protected from weather shifts or foot traffic movement.
Best practices for securing your branded tent:
-
Always anchor legs using weights or stakes.
-
Use guy lines in high-wind settings.
-
Recheck anchor points midway through long events.
-
Avoid placing heavy items on the canopy fabric or truss system.
Following these canopy tent instructions ensures both safety and a lasting first impression.
Post-Event Breakdown
Tear down should follow the same level of care as setup. This maintains the lifespan of your tent and preserves print quality for future events.
-
Remove sidewalls and promotional accessories.
-
Lower all legs evenly.
-
Unlock the frame and collapse it slowly from opposite corners.
-
Detach the canopy top and fold it loosely.
-
Clean the frame and canopy using a soft cloth and mild soap.
-
Dry all parts fully before storage.
Proper teardown supports smooth operation at your next event. It also prevents long-term damage to prints, seams, and locking parts.
Maintenance & Storage Tips
A custom canopy tent is a business asset. With consistent use, wear is normal—but damage is avoidable with the right care.
Maintain your investment by:
-
Storing your tent in a cool, dry area in its provided case
-
Cleaning after each use to remove dust, oils, or moisture
-
Inspecting fasteners, trusses, and leg locks before every event
-
Keeping replacement hardware available for emergency fixes
Most custom canopies last 3 to 5 years in active field use, depending on the environment and care.
Need a tent that turns heads and carries your brand forward? Contact us at Starline Tents.
Our custom-printed canopy tents are made for real-world business needs—designed for easy setup, strong weather resistance, and vibrant print clarity.
Final Thoughts
To conclude, it can be said that understanding how to set up a canopy tent is essential for any business that depends on visibility in event-based environments. Your team can consistently present a strong and professional display with a few reliable steps and tools.
A branded canopy tent brings immediate recognition and builds trust as well. It enhances your brand’s identity across markets, outdoor events, and public activations when used correctly. One canopy can serve dozens of campaigns with proper care and alignment without compromising quality.
Avoid generic solutions. Invest in a business tent set up that works for your brand—clear, mobile, and built to last.
Frequently Asked Questions (FAQs)
1. Why should I buy a custom canopy tent for my business?
A custom canopy offers brand visibility, portability, and protection. It serves as both a shelter and a promotional tool at any outdoor or on-location event.
2. What makes a canopy tent different from a party tent?
Canopy tents for business use include full-color printing, reinforced frames, and hardware built for frequent setup. They focus on presentation, not decoration.
3. Is this guide applicable to all branded canopy tents?
Yes. These canopy tent instructions apply to most aluminum or steel-framed pop-up tents used in commercial settings.
4. How long does setup take?
With two people and a clear space, setting up tents takes 5–10 minutes. Familiarity with the frame and canopy makes the process faster over time.
5. Can I update the design later?
Yes. You can reorder just the printed canopy top to reflect new branding while keeping your original frame.
Tags:
Previous
Custom Tablecloths Explained: A Complete Guide to Event Branding
Next
The Ultimate 2025 Custom Pop-Up Tent Buying Guide